Hot Cross Buns

Hot Cross Buns

Happy Easter! I had an amazing Easter dinner tonight (preceded by an Easter egg hunt in my childhood park!) and am currently on the couch digesting, in disbelief that tomorrow is April 1st. Back at the end of February, I made one goal for March: Hot Cross Buns or BUST. They’ve been on my to-bake list for the past two or three Easters, but always get pushed aside for other Easter treats like: Lemon Meringue Cookies, Easter Candy Bark & Homemade Cream Eggs, Chocolate Marshmallow Cups and Easter Nest Sugar Cookies.

There weren’t really any Easter treats that had me running to the kitchen this year, which worked out perfectly so I could devote some time to finally make these. Here’s the thing about Hot Cross Buns: they’re one of those things that just taste so much better homemade. The ones in the grocery store are just not up to snuff in my opinion.

Tangent alert: I went to a lunch function for my company with my co-workers last week, and when dessert was served (apple crumble square) I took one bite and left the rest untouched on my plate. Now, these people have seen me bring in copious amounts of treats over the past 10 months, and they have probably never seen me turn down sugar. One of my co-workers (who’s vegan, and was just having fruit), asked why I didn’t like it, and I proceeded to go off on a tangent about seasonal eating, and why the caterer shouldn’t be serving an apple-based dessert in the Spring, and that I could tell it was made with shortening, and how it was generally pretty gross. She looked at me with wide eyes and said “You’re a FOOD SNOB!”. I ask you, dear readers, what is the appropriate response to this accusation? I just shrugged my shoulders and laughed, because, obviously this is true, and I have passionate views when it comes to food and butter vs. shortening in particular. But is that necessarily a bad thing?

Back to Hot Cross Buns. This is actually PW’s recipe for Cinnamon Rolls, with just a couple little changes. Couldn’t be easier, just don’t burn your milk (coughNicolecough), and you’ll be fine. Hope you had a nice, relaxing Easter weekend!

Hot Cross Buns

Source: Pioneer Woman (P.S. If you live in Canada, Food Network Canada has just started airing her show on Sunday mornings, it’s soooo amazing)

Yield: I got 14 buns, but it will depend how big/small you make them

Ingredients

1 cup milk

1/4 cup vegetable oil

1/4 cup sugar

1 1/4 tsp active dry yeast

2 cups all-purpose flour (9 oz) + 1/4 cup all-purpose flour (1 1/8 oz)

1/4 tsp (heaping) baking powder

1/4 tsp (scant) baking soda

3/4 tsp salt

+ 2 tbsp sugar mixed with 1/2 tsp cinnamon

+ 1 egg white mixed with a splash of milk, for glaze

+ 1/2 cup icing sugar mixed with a splash of milk, for cross garnish (you may need to add more icing sugar or milk to ensure you have the right consistency for piping on the crosses)

Directions

  1. In a small saucepan, mix the milk, oil and sugar and heat until scalded, just before boiling. Pour into a big oven safe bowl, and add a candy thermometer so you can monitor the temperature.
  2. When the mixture has cooled to 110, sprinkle the yeast over top and let sit for 5 minutes.
  3. Add in the 2 cups of flour and stir. Cover and let rise for at least an hour, until doubled in size. (I turn on my oven to it’s lowest temperature [170], then shut it off, and put my bowl in the oven. I never know if it’s warm enough in my condo for things to rise).
  4. Once dough has risen, stir in remaining 1/4 cup flour, baking powder, baking soda and salt. Stir together.
  5. Clear a large space on your counter, and sprinkle with flour. Flatten the dough into a rough square, and sprinkle with a 1/3 of the cinnamon sugar mixture and 1/3 of the raisins. Fold the dough in half, seal, and stretch out again, sprinkle and stretch again, and then one last time.
  6. Pinch off golf ball size pieces of dough and roll them into a ball. Place on a baking sheet sprayed with non-stick spray, and then cover with a clean tea towel and let rise for another hour.
  7. Preheat oven to 375. Brush the tops of the buns with the egg wash, and bake for about 15 minutes (I baked mine at 400 and they browned very fast, so I’m recommending lowering the temp).
  8. Let the buns cool completely. Pour your icing into a piping bag, or plastic bag with the corner snipped off and pipe on crosses.
Posted in Bread | Tagged , , , , | 1 Comment

Baked Sunday Mornings: Chocolate Peanut Butter Fondue

Chocolate Peanut Butter Fondue

Three ingredients + one bowl + a fully functioning set of tastebuds = Baked Sunday Morning success!

I think the fun thing about this week will be seeing what my BSM friends select as their dippers of choice for this rich, sweet fondue, that obviously tastes like peanut butter cups. I, for one, am craving warm weather and summer, so I made myself a S’more. I let my fondue cool in the fridge until it reached a spreadable consistency, then smeared it on a graham cracker and topped it with a toasted marshmallow.

You can find the (ridiculously easy) recipe here! (This recipe is very easy to scale down to size, I used 2 oz chocolate, 6 tbsp peanut butter, 1/2 tbsp cream, and it made about 1/2 cup fondue).

More Baked Sunday Mornings here!

Posted in Baked Sunday Mornings, S'mores | Tagged , , , , , , | 8 Comments

Goulash {Gastropost Mission #41}

Goulash

Our Gastropost Mission a couple of weeks ago was all about NOODLES, and the Mission Inspiration was Asian noodles in particular. This is something I feel is best left to the pros. Yes, I have attempted to make Pad Thai at home many years ago. No, it did not go well, and resulted in a bottle of fish sauce in the fridge that I never opened again. But these Missions are about challenging ourselves, right? Unable to turn this Mission into a dessert like I normally do, I selected a recipe and got to work.

How did it go, you ask? Hmmm, not so well. I tried this recipe for Vietnamese Vermicelli Salad with Peanut Crusted Chicken, but it just did not float my boat. I didn’t really like the sauce. But hey, I tried right? It sure looked pretty though:

Vietnamese Vermicelli Noodle Salad

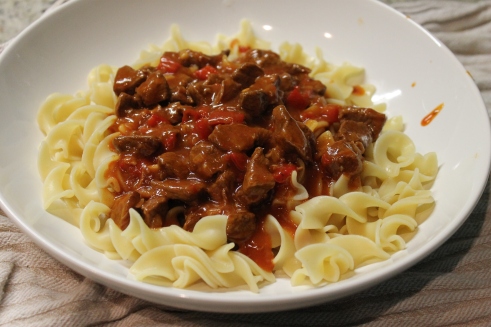
I considered some other noodle dishes, and having nailed recipes for my favourite pasta toppers back in the early days of Planet Byn, moved on to something I’ve wanted to make for ages from Smitten Kitchen: GOULASH! This is essentially a beef stew with bacon, red peppers, and LOTS of paprika, simmered low and slow for a few hours. Where do the noodles come into play, you ask? You serve this delicious concoction over egg noodles. Mission accomplished!

Goulash

Source: Smitten Kitchen

Ingredients

3 slices bacon, cut into small pieces

1 lb boneless stewing beef, cut into 1/2″ cubes

1 tbsp vegetable oil

2 small onions, chopped fine

3 garlic cloves, minced

1 1/2 tbsp paprika

2 1/2 tbsp flour

2 tbsp red wine vinegar

2 tbsp tomato paste

3 cups beef broth

1/2 tsp salt

1 red pepper, diced

Directions

  1. In a dutch oven, or large saucepan with a lid, cook the bacon over medium heat. Drain on a plate lined with paper towl.
  2. Brown the beef in batches and remove to a plate.
  3. Reduce heat to medium low, and heat the oil. Add the onions and garlic, and saute for 6-8 minutes until golden. Sprinkle in the paprika and flour and cook, stirring for 2 minutes. Add the red wine vinegar and tomato paste, and cook for another minute. Stir in broth, salt, red pepper and add back the bacon and beef. Bring to a boil, then lower to a simmer, and cover, stirring occasionally for 1 1/2 – 2 hours. *I wanted mine to be a bit thicker, so I added a cornstarch slurry at the end – about 2 tbsp of cornstarch, whisked with a bit of water*

*This is supposed to be served with a cucumber salad that I didn’t get to this time, but will next time!*

Posted in Beef & Pork, Pasta & Noodles | Tagged , , , , , , | Leave a comment

Turkey & Feta Stuffed Peppers

Turkey & Feta Stuffed Peppers

When I was in high school, I babysat for a family for with three little boys. Their mom was in nursing school, and I sometimes slept over when she was on night shift. (Did I mention she was a single mom? In retrospect, holy cow.) Anyway, on those nights, she would prepare dinner in advance, so all I had to do was heat it up for the kids. I don’t remember anything else about those dinners except STUFFED PEPPERS. They were so good, and also had a novelty factor because they just weren’t something we ate at home.

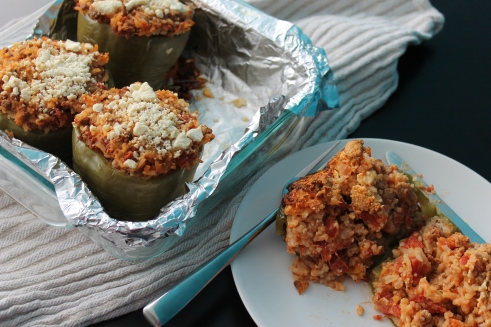
Fast forward 15 years, and I truly could not tell you the last time I made stuffed peppers. Maybe in my first few post-university years, but they definitely involved Minute Rice, soooo…yeah. I pinned this recipe as soon as I saw it back in October, and I’m not sure what took me so long to make it. This was the best thing to come out of my kitchen in a month when nothing was really going my way! The only change I made to the recipe was to add some cooked rice, since that’s how I remember they were prepared back in the day, as well as to double the baking time, since I like the peppers to be soft instead of crunchy. The feta adds a nice salty edge. I ate this for lunch everyday for a week, and never got tired of it. I think it’s time to make them again!

Turkey & Feta Stuffed Peppers

Source: Eat, Live, Run (another Jenna recipe…she’s on a roll)

Ingredients

4-5 green peppers (maybe 6 depending on how big the peppers are where you live)

1 tbsp olive oil

1 medium onion, diced

3 or 4 cloves garlic, minced

2 tbsp tomato paste

1 lb ground turkey

1 28oz can diced tomatoes

2 tsp dried oregano

2 tsp salt

1/4 tsp dried red pepper flakes

1 cup feta cheese, crumbled

+ cooked white rice (I added 1/2 cup dry white rice with 1 cup water to my rice cooker)

+ extra feta for sprinkling on top

Directions

  1. Preheat oven to 350 and line a glass baking dish with foil. Spray with non-stick spray. Slice the tops off the peppers and pull out the core and seeds.
  2. In a large skillet, heat the olive oil over medium heat, and saute the onion for 5 minutes or until soft. Add the garlic and saute for 1 more minute. Add the tomato paste and saute for 3 minutes.
  3. Increase the heat to medium-high and add the ground turkey. Saute until brown and cooked through.
  4. Add the diced tomatoes, oregano, salt and red pepper flakes. Stir and bring to a boil, then reduce heat and let simmer for 15-20 minutes until sauce reduces. Remove from heat and stir in feta and cooked rice (if you’re using it). Fill the peppers, and sprinkle a little extra feta on top.
  5. Cover dish with foil and bake for an hour, until peppers are soft. They’ll keep in the fridge for a week.
Posted in Chicken & Turkey | Tagged , , , , , , | 2 Comments

Thick, Rich Tomato Sauce with Beef, Peppers & Mushrooms

Meat Sauce

2013 is off to a rocky start here on Planet Byn. Whether it’s travel issues (two cancelled flights + almost missed connection), dental issues (cracked tooth + root canal + crown) or health issues (two colds + copious amounts of snot + clogged ear), it’s been hard to stay positive and just generally make it to Spring in one piece. I truly cannot wait for sunshine, trench coats, flats, sunglasses, walks at lunch, tulips, rhubarb and just that fresh start that comes with Spring.

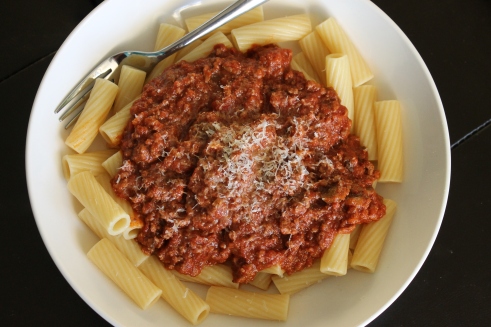
Before we get to that though, this week I’ll share a few recipes for some comfort food I’ve made over the last few months. This first recipe I made on New Year’s Day, and it’s just phenomenal. I’m sure not everyone needs a recipe for meat sauce (which P.S. I just couldn’t bring myself to name this post Meat Sauce…it does not do it justice), but as we all know, I don’t do well without recipes, so this one was a great guide for me. I generally prefer Spaghetti & Meatballs, but something about this was calling my name. It’s a thick, rich tomato sauce fortified with red wine, and full of beef, peppers, mushrooms and onions.

The recipe as written makes a HUGE pot of sauce, which will only get better as it sits in your fridge, or in my case, in little tupperware containers in the freezer. When I finally got home from the airport on that cursed trip, I pulled one out, defrosted it in a saucepan, boiled some pasta, and seriously savoured every single bite. Make this. You won’t regret it!

Thick, Rich Tomato Sauce with Beef & Veggies

Source: Eat, Live, Run

Ingredients

1 1/2 tbsp olive oil

1 large onion, chopped

1 green pepper, chopped

1 red pepper, chopped

20 oz sliced mushrooms (I used cremini, which are baby portabello mushrooms)

2 lbs ground beef (original recipe used 1 lb ground beef + 1 lb spicy Italian sausage)

28oz crushed tomatoes

24oz tomato sauce (like plain, basic, no-name brand tomato sauce)

12oz tomato paste

1/2 cup – 2 cups red wine (I used 2 cups)

6 oz freshly grated romano or parmesan cheese

1 tbsp dried oregano

1 tbsp dried basil

1 bay leaf

1 tbsp garlic salt

1 – 2 tbsp sugar

+ salt & pepper

Directions

  1. In your biggest pot, heat the olive oil over medium heat. Add the onion, peppers and mushrooms, and saute for about 6-8 minutes until vegetables are softened. Add ground beef and saute until browned and cooked through.
  2. Add crushed tomatoes, tomato sauce and tomato paste and stir well. Add wine, cheese, spices and sugar, and stir again until sauce comes to a simmer.
  3. Simmer over low heat for two hours, stirring occasionally. Taste periodically and add salt and pepper as you see fit. You can keep it in the fridge for up to a week, or in the freezer for 3 months.
Posted in Beef & Pork, Pasta & Noodles | Tagged , , , , , , , | Leave a comment